Starting Construction
When the gang punch stops, it's probably the table. Don't pound anymore...If you're like me, you can't wait to get the big pieces put together so it'll start looking like a boot. Don't. Be patient. What you're making is a tube with a sole on the bottom, and it's hard (if not impossible) to attach things working from inside a tube. There's an order to do this in, and you have to stick to it or your life will be very unhappy.
Start with the soles. You should have two sets (left and right) of the light leather (sole plus one quarter inch) and of the heavy leather (sole without the extra one quarter inch). You need to start by taking the two heavy pieces and 'breaking' them. Crush them, wad them up, whatever. I like to break them across the edge of my workbench by pulling straight down over the edge with my other hand holding the piece down. The goal is to get the stiff, heavy leather to be about as limp as a wet dish rag. This will really help later when you have to turn the boot inside out.
If your soft leather is fairly heavy, 5 ounces or more, you'll want to skive the edge.
It's a bit of a balancing act here: skive too much and you'll weaken what will be - after
a few more pages, here - a seam; skive not enough, and you'll have a very stiff seam that
might ultimately be uncomfortable against the foot. You can purchase one of two tools
here, a skiving knife or a skiving tool. The knife is just that - a knife. The tool
is a handle that takes specially shaped single-edge razor blades. I like the tool, personally:
it seems safer, and I can control it better.
Always skive with a sharp blade. If the blade doesn't push through the material
easily, discard it and insert another one (or sharpen your knife). More accidents happen
from dull blades than sharp blades, because dull blades are harder to control.
Apply cement to the smooth sides of each, leaving a clean 1/4" edge on the heavy leather, and a clean half inch on the light. Don't put them together...this is contact cement you're working with, it needs time to get ready. Go fix a cup of tea, Bewley's is nice, Twinings is also good. You'll have time.
You'll know when the cement is ready by how it looks and how it feels. When it's ready, it'll turn dull - it's shiny when you first apply it - and it will no longer be sticky to the touch. If you're used to working with epoxy, where the pieces have to be put together while the cement is still liquid, this'll seem strange. Trust me: the best holding power happens when you put the pieces together after the cement is no longer liquid and sticky.
|
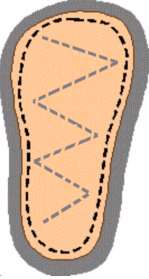
| fig. 1 |
Now stitch the pieces together, a scant 1/4" from the edge of the heavy sole, as shown in figure 1. If you like, run some extra stitching down and back and forth across the middle. This'll help keep the soft midsole from stretching and deforming over time and having a foot on it for long periods of time.
|
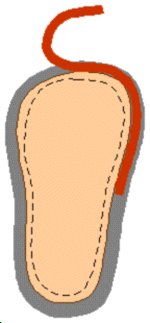
The last thing the sole needs before you move on to other things is a welt (pictured in reddish). A strip of the light leather 1/4" to 1/2" wide cemented to the mid-sole as shown in fig 2. If you have to use more than one piece of welting, overlap the edges by a half-inch or so, skivving the ends.. Do the same when you reach your starting point. |