Footwear - Getting the Pattern
Or: Even more interesting things you can do with duct tape...The most common question I'm asked about my boots (other than who made them) is "Where did you get the pattern?" My reply is simple:
I was my pattern. Or, more precisely, my leg was my pattern. A variation on this method works for bodices, too, and is more accurate than drafting. What you have to realize and grow accustomed to is the idea that you will be translating a three-dimensional object (your leg) into a two-dimensional object (the pattern) and they aren't going to look much the same. The two-d object is going to wrinkle in places the other didn't. It'll take some manipulation to make it work, but once you understand the dynamics it's easy!
We'll get to that.
New info!
Get a sock. A tall sock. Ideally, one that is way too big for you. The perfect sock is one that when you put it on it reaches your knee and doesn't stretch a lot while doing it. If you can't find a tube sock that will work, look for a product called "stockinette." You can order it by the yard here. Put it on and have someone else wrap your leg, overlapping each new strip of tape halfway over the previous. Don't do this yourself: you need to be standing in such a way that would make that impossible unless you're reeeally limber, as in circus contortionist limber.Stand straight, feet far enough apart to give the person doing the wrapping room to work. The booted leg should be more or less straight up and down.
 Once the leg is thoroughly encased, you need to draw some lines. When
the duct tape "boot" is removed these lines will show you where the seams should
be, and how to align the pieces (very important: don't convince
yourself that you'll remember. You won't.).
Once the leg is thoroughly encased, you need to draw some lines. When
the duct tape "boot" is removed these lines will show you where the seams should
be, and how to align the pieces (very important: don't convince
yourself that you'll remember. You won't.).
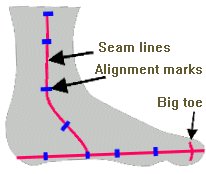
In the illustration to the right there, you can see I've marked the big toe and the seams in red. Those marks are essential. The other "red" marks you can't see are the seam on the other side, and a line up the center back of the leg. Some notes about the lines/marks:
- The sole: If you're using a fine point "Sharpie", lay the pen on the floor on its side (that'll put it at about the right height) and draw a line around the foot, keeping the pen perpendicular to the foot at all times.
- The side seam: draw a line more or less straight down the side of the leg,
but NOT over the line of the ankle. I tried that my first time and it didn't work:
you'll get a seam there that's uncomfortable on the bone especially if you dont skive
the edge of the inside seam allowance.
Also, bear in mind that the inside of your leg and the outside will be drawn differently.
- Inseam. The line comes down right on the front edge of the ankle bone.
- Outseam. The line comes down 3/4" forward of the ankle bone.
- The vertical lines in the illustration are pretty curved, but in reality they need to be as straight as possible.
- The big toe: I show it marked somewhat on the side. Mark right on the tip of the toe.
- The center back line: this line, along with the big toe, are two lines that
if you omit every other line between the upper and the sole you want to include these.
If you do not it is likely that the upper will end up rotated on the sole a bit, making
the boot twist when it's done. My first pair was that way, and it isn't very comfortable.
You don't need a center back line: it can be a simple mark. However, if you find that you can't get all the pieces onto the leather, cutting the back piece in half at the center back line can many times provide you the wiggle room you need to get the pattern pieces on the leather, and to get that seam correct you need a line. It also gives you a guide to the placement of a foxing, which can look awkward if it's crooked.
Using a pair of blunt nose scissors, cut down the outside seam line to the sole. Your subject should be able to slip the duct tape boot off. Cut it apart on the lines you drew.
The last step is the bottom of the foot. Have the subject stand on a piece of paper and trace around their foot, being careful not to angle the pen in such a way that the bottom comes out too large or too small. Mark the big toe and center back of the heel.
Done? You may be asking yourself, now what? Read on...
* Cast stocking can also be ordered by the box - yards and yards of the stuff. You can order it in single yards from my retail site, / target="_blank">Seamlyne.Com.
