Sewing on the Buttons
Almost there...It might seem a little silly to have a page just for the subject of sewing on buttons. However, it often surprises me that there are people in this world who can make anything you might ask them to: a bodice, a suit of armor, a room addition, a weapon of mass destruction, but can't sew on a button.
| There is actually a method to it, and hopefully the illustrations here help. The buttons need to be placed
staggered with the button blocks, with the first one placed just above the first lacing block, the one built into the
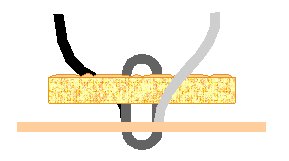
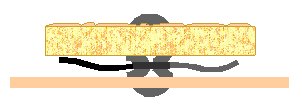
heel block. Punch two holes about a quarter inch apart in the button block where the button will go. Using VERY heavy thread (I like the stuff you buy at Tandy that they supply with the stitching awl - waxed nylon, I think), sew through the button and the button block four times, leaving 'tails' about four inches long on each side, and a 'shank' of 3/8" or so, as shown. |
|
|
Take the 'tails' and wrap them around the 'shank', one at a time, one clockwise, the other wickershins. That done, yank 'em tight and tie them in a square knot and trim them off. Leave a little on, 1/4" or so. The button will hide it, and the thread will be less likely to 'just work loose'. |
